Sunday 27 March 2016

Quelling the Easter Boredom

I've recently 'invested' in a DJI Phantom 4 drone - it's an amazing piece of kit, but that's a whole other story... Anyway... I bought it to try and get some good footage of the Caterham with the hope of adding a new dynamic to my videos (if I can use it at track days) and perhaps get some nice scenic road footage and so on...

Desperate to try the drone out, I checked out the weather and the only real opportunity this weekend was Good Friday... So I grabbed the drone, a couple of GoPro's and went to a dis-used car park...  Set up some cones and done some slide-y stuff.

It's a short video, and my first trial using the drone, but a bit of fun nevertheless...
Enjoy (please like/thumbs up if you do!)

620R Countersunk Seat Fasteners

I always thought that the seat fasteners under the floors seemed like a bit of an 'afterthought' or perhaps, just not a clean solution - jeeze, there are cap head bolts on the underside of the floor... It just doesn't look right... Rant over...

...Well now, there is a solution!  The Caterham 620R seat fastener pack (part number 3FV179A).  Nigel Pugh is building a Superlight Twenty and sent me a picture of these new seat fasteners that have a countersunk washer and bolt - I was dead jealous, so ordered a set immediately!

They arrived yesterday morning however, the 'new' seat runners are not available as a spare part (yet) or Caterham didn't have them as a spare part in stock (I can't remember)...  But... the good news is that the new seat runners (part number 3FV189A) have captive nuts, which means no more fiddling and cursing when trying to get that blasted drivers seat back in - I can't wait for those to come in stock!

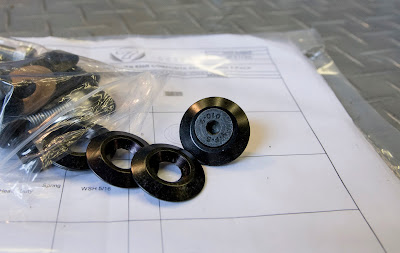
Here's the pack of fasteners, and you can see the countersunk anodised washer and bolt - they look very nice, and much more 'finished' that the standard bolts sticking out the bottom of the floor, that's for sure.
Caterham 620R seat fitting pack with countersunk washers and bolts! Part number 3FV179A
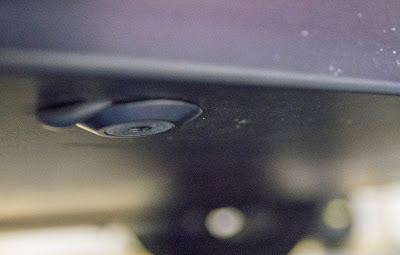
Replacing these bolts on the passenger side took less than five minutes, and really cleaned the underside of the car up - I really like them (shame my car has some rubber grommets in some holes that the CC factory incorrectly drilled, due to the 620R seats fitting differently to the standard kevlar Tillets).
New 620R countersunk seat fittings in place (the bulge in front is a rubber grommet - see above)
I think they are a direct replacement to all metric seat fittings, look so much better than the standard bolts and have a lower profile so less chance of shearing them off, but at about £25 for the pack some may consider it expensive for the upgrade.

Wall Mounted Wheel Rack

With a nice set of freshly painted wheels and rims - surely I'd need somewhere to store them?!?  Well obviously stacking them on the floor wouldn't be good enough, so last year I bought a fairly cheap tyre rack on eBay... Put it together, and it wasn't the right size for the 13inch wheels, and not only that the way it was put manufactured (and I think this is the case with quite a lot of tyre racks) means that you'd have to rotate the wheels every so often, due to the bars supporting the tyre may cause an indent in the tyre making it less than ideal when you come to use them.

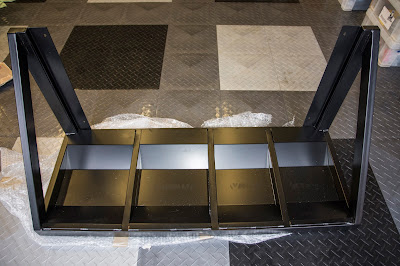
So to cut a long story short! I thought the best thing to do would be to have tyre rack that held the tyres properly, but had a flat bottom... So I measured up, asked a few local companies if they could fabricate something for me, and a few months later - this is what we came up with... A 'Caterham' Tyre rack:-
A Caterham tyre rack designed with a flat bottom to support and not indent the tyres
It's quite heavy, so I got some anchor bolts and mounted it on the wall...
My own design of a wheel rack suitable for holding Caterham Wheels and Tyres.
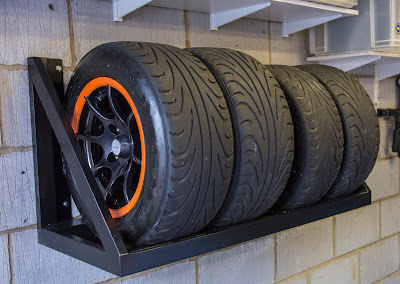
And one final pic of the new wheels on the rack:-
Freshly painted wheel rims on new wall mounted Caterham wheel rack
Now I'm off to meet up with someone that's made some Carbon bits for me - ooooh exciting :-)

Saturday 26 March 2016

It's All About The Wheels

Last year having had my track day wheels finished off with a lovely (RAL 2004) orange rim (to match the stripes on the car), I grew fonder and fonder of them, and decided that I wanted another set of wheels for road use - the only difference is the road set will be shod with (for now) my set of Avon CR500's (soon to be ZZS's) and I wasn't going to paint the tyre wall lettering, as I thought that was a bit much for 'road' use...

So having made the decision to get the road wheels repainted, I took them at the beginning of the year to mint alloys and had them repainted in 'Skoda Glitter Black'.  Mint alloys provide a great service, with the drop off to collection taking around four days.  A link is here to the process they go through to get your wheels looking brand new again...

With the wheels repainted, all that was left to do was to pop over to see Dave at Daytona Coachworx to give him the 'bad news' that I wanted another set done!  He said he didn't want to do another set last year, but if we done it again it would've been worth leaving the tyres on the wheels, so-as not to ruin the freshly painted rims when the tyres were put on - so I was 'nice' and left the tyres on for him! Less than impressed, Dave said he'd have them to me towards the end of March as he was pretty busy - which was fine by me.

Earlier this week I got 'the call' from Dave ago say that my wheels should be ready on today...  So keen to see them I asked for some pictures:-
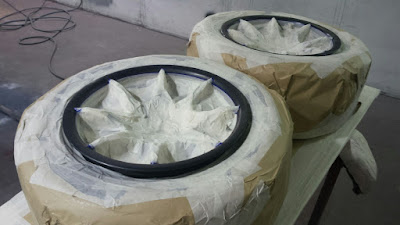
Here are the wheels with the tyres, barrel and spokes masked up - great attention to detail
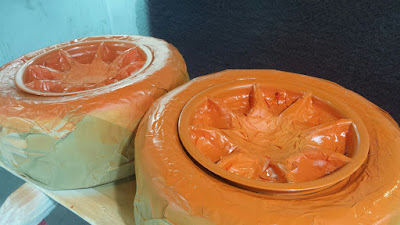
The rims were painted with RAL 2004 orange - to match the stripe on my car
Masking on spokes removed to show what the wheels will look like
I detailed the full wheel rim repaint last year and have linked to that post here.

And here is the finished set that I collected this morning:-
Caterham R500 13 inch 8 spoke alloy wheels with painted orange rim and Avon CR500 tyres
Once again I'm left very impressed with Dave's work and attention to detail.  I'll be dropping off some more bits to be painted by him in the very near future...

Friday 18 March 2016

Wiper Motor Removal - With Guide


Having a spare hour last night, I fancied a quick stab at getting the wiper motor out.  Some rumours suggested it weighs up to 7kg, but I wasn't too sure - so there was only one way to find out. 
 
Here's my removal guide on a metric Duratec car - your car may differ, so I'd suggest reading the whole post before attempting it yourself (however it was pretty straight forward).
 
Firstly remove the what I call 'Knee Panels' - and you'll get access to these two bolts under the dash in the passengers footwell (circled in image below).  These two bolts hold the rubber u-clamp in place, which subsequently keeps the wiper motor tightly fitted.  It's a little fiddly to remove these due to access, but there is a nyloc nut on the upper side which you can't see, so use a 10mm spanner to secure these whilst you undo the allen bolts.
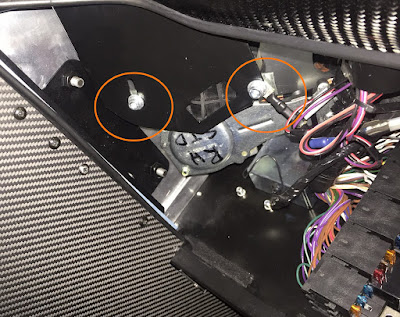
Two allen bolts hold the u-clamp and subsequently wiper motor in place
With the wiper motors' u-clamp removed, the wiper motor should be just resting on the metal panel (pictured above).  You then need to remove the two nuts around the wiper motor spindles, as these are holding the spindles into the scuttle. 
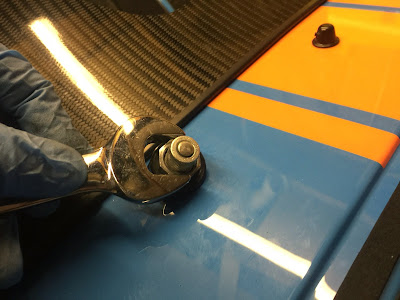
Removing these nuts loosens the wiper spindles from the scuttle.
With the wiper spindles loosened, remove the black plastic parts and then the spindles should just push down through the scuttle.  Now the next part is a touch fiddly....

You need to move the wiper motor around so that it is free from the 'holder' but whilst you do that you need to ensure that you remove any tie-wraps that could be keeping any wiring tight (or restricting access) and then remove the connection block for the wiper motor, pictured below.
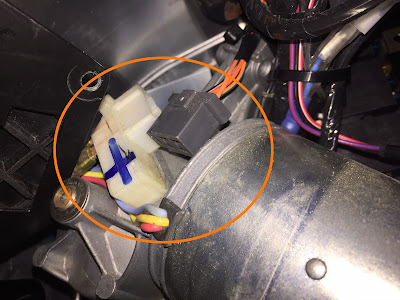
Make sure you unclip the connection block
Once you've jiggled the motor round, (and unclipped the connection block!) it should be 'hanging loose' a bit like the image below.
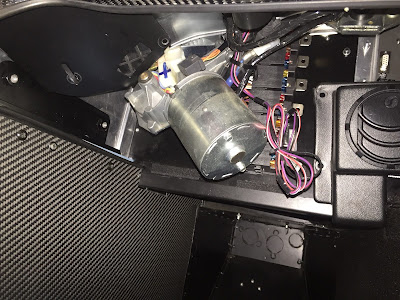
Caterham wiper motor 'hanging loose'

With the wiper motor 'hanging loose' I tried to jostle the lot out, but quickly figured out it's far easier to take the lot apart and then remove it bit by bit.  Firstly undo the nut I've highlighted in the image below, which basically holds the mechanism together.
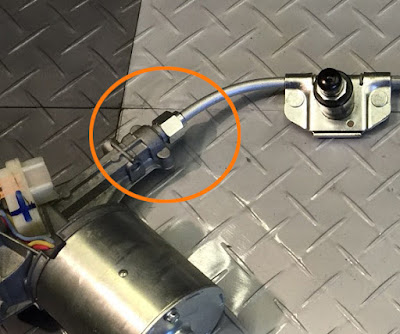
This nut holds the main mechanism and tube together
With the nut (above) loosened, you'll be able to pull the twisted wire through the tubes and the motor will be free.  All you'll be left with is the tubes and the wiper spindles which are clamped together, simply loosen these nuts with an 8mm spanner and the tubes come free. 
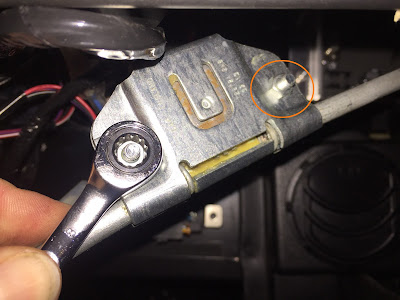
Use an 8mm spanner to loosen these nuts to remove the spindles from the wiper tube
With the spindles removed from the wiper tube on both sides, all that's left to do is free them from the tangle of wires (ensure you remove any tie-wraps that may cause a snag) and that's the job done.  (note the passenger side is easier than the drivers side due to the tube length).

The image below shows the top of the scuttle with the wiper motor removed and spindles removed but now there are two holes (well three once the washer jet is removed).  I guess an easy way to fill these holes would be to use a couple of rubber grommets, but I personally don't think it'll look that nice/clean, so a new scuttle has been ordered (and delivered a few weeks ago) so I'll be getting that painted and will be fitting the new scuttle in the not too distant future.
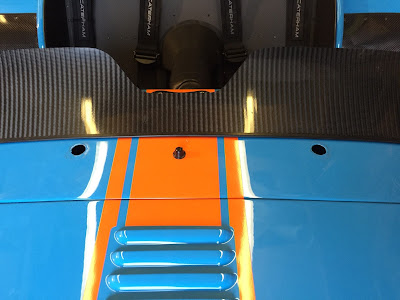
Scuttle showing wiper motor removed and two (well three!) holes - easily fillable using some rubber grommets
And here's the offending article!  The wiper motor and spindles.
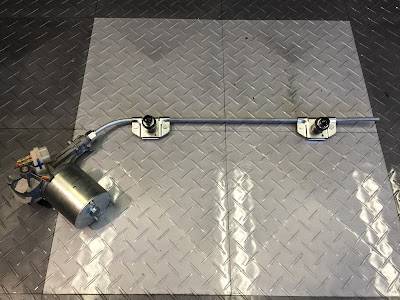
Caterham wiper motor and spindles
 Now time for the inevitable weigh-in... Not quite the rumoured 7kg, but 2.43kg so a decent saving.
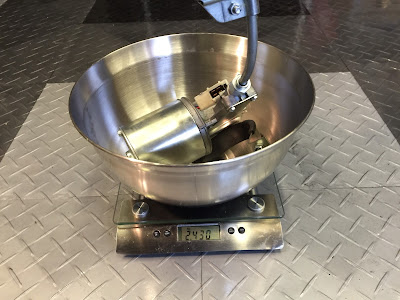
Caterham Wiper motor and spindles weighed in at 2.43kg
Considering the relative ease of removal, and the weight saving I think this was a decent 'downgrade'!  And definitely some more lightness added, so I'm happy.  Total time was around an hour and a half.

Hopefully this afternoon I'll get the seats back in, fire it up for the first time this year and go for a quick blat... I also discovered there's a weighbridge quite local to me, so may take the car over there to see what the current 'new' weight is too.
Tuesday 15 March 2016

Back on the Radar and Pipe Polishing

Having gone off the 'Caterham' radar for a while, I thought it a good idea to bite the bullet and get back on with the show.  The weather was great at the weekend and subsequently I started to get that 'I need to drive the R500 again' feeling... So it was time to get a move on with the 2016 'prep'... Funnily enough I think a lot of Caterham owners felt the same last weekend, as there was a huge spike in web-traffic to the blog, so I guess everyone was thinking the same...

So... A bit of a laborious task, but I wanted to get the exhaust downpipes, cat bypass and exhaust can polished up (again) ready for a year of use and abuse.  I'd purchased a table mounted polishing machine last year, along with a number of mops and compounds, so thought it best to stick to my plan of polishing everything up at the start (or perhaps end) of every year.

I've already written a detailed post about moving dangerously to polisher status, that incorporates the polishing process, so rather than bore myself typing it all out again, I decided to just publish the 'after' pics.  
Freshly machine polished Caterham downpipes
Gleaming exhaust and Cat bypass pipe


Pretty much everything on my list of things I wanted to do this year has been completed, but there are a few things that are still to be done - here's the updated list:-
  • Road Wheels Re-sprayThis is underway, the wheels have been re-powder coated and are currently having the rims repainted, and I expect to have these back before the end of March.
  • Polishing the Exhausts (again!) - See above... done
  • Replace ANOTHER headlight that's cracked - done
  • Fit my lovely new carbon interior panels! - done
  • Remove the hoodsticks and replace boot cover - done
BUT... There's a few additions!
  • Bespoke Carbon Parts - Pedal Box, Knee Panels, Fuel Pipe Cover and 12v Socket Holder
    I've instructed a carbon manufacturing company to produce a set of carbon parts that are an easy swap out and should save a kilo or so... I've donated my pedal box cover, knee (IVA?) interior panels, 12v battery socket holder and fuel pipe cover so the moulds have been made and the initial pictures look very encouraging as you can see below...
Carbon Pedal Box Cover for Caterham
  • Carbon Bonnet!
    Based on the pics I received for these new carbon parts, I've also decided to go balls deep and instructed the manufacturers to fabricate a carbon bonnet for me too - more on this later!
  • Bespoke Tyre Rack
    I've also given the nod to a local company who are making a bespoke 13 inch tyre rack - more on this later too... 
  • Wiper Removal
    Following on from the main theme over this winter (which is weight saving) I decided that it'd be a good idea to remove the wiper motor, as this is rumoured to weigh about 7kg (which is a considerable amount), so will be pressing on with this hopefully this or next weekend.  Being a bit 'OCD' (I'd like to think of it as attention to detail!) removing the wiper motor would mean there would be three holes in the scuttle which most people would cover with grommets, but I decided to take the more 'no compromise' option and will be replacing the scuttle.  I've already ordered the new scuttle (which arrived a few weeks ago) and will get this painted at the same time as the carbon bonnet.
  • Final Fit
    I'll need to order a new tripe stripe set of decals and then put it the rest of the car back together.
Having typed up what's left to do (or should I say what I've given myself to do) I'm feeling happy that the end of this winters 'project(s)' is in sight and blatting time is nearly here.